Never one to be satisfied, I'm making plans for what the youtubers call a REFRESH of the bedroom!
Bit of a back story: Our house has two bedrooms -- the second bedroom functions as a library, office, and guess bedroom (via sleepsofa). It's a room for Mark's crap, which we clean up whenever guests come to stay. Some day I hope that we'll have decluttered enough to look decent 365 days of the year. But our bedroom is a pretty good size for a 1930s Dublin house, so that's where my desk lives. In the corner. The dark, dark corner.
As some of you know, I got a new job back in October, and come May when my probation is up, I'll be working from home two to three days a week. I have no interest in working in the chaos of the office, but I don't want to be stuck in the corner of my bedroom either! So that got me thinking...
Just out of interest (because it's bonkers), I'll share a photo of what our bedroom looked like after we stripped the wallpaper:
 ANYHOO there will be three major elements to the bedroom refresh. First, the desk situation. Here's how it looks now:
 You can barely see my desk in that corner! And it gets quite cold under the desk, even when it's warm in the rest of the room. So I've decided to swap the desk and the wardrobe. But ALSO I want to replace my desk, which is currently a very small, white IKEA desk with two shelves above. Once the wardrobe is moved into the corner of the room, I'm going to put a slightly different configuration of this IKEA Svalnas desk/shelving situation next to the window:

The next area that I want to change up is the wall behind the bed. Here's how it looks now:
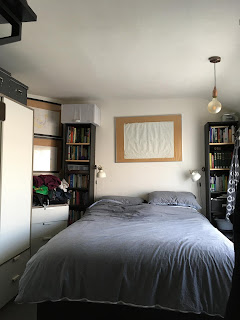 Lord give me strength that Mark has put that storage thing on the top of that bookcase, but ignore that -- it'll be going away, as will the pile of clothes ;)
As you can see, we have two tall black bookcases on either side of the bed. But the whole thing is kind of blah. So I'd like to do an accent shiplap wall and paint it black, sort of like in this video (except probably real shiplap instead of faux). Shiplap is generally a tongue-in-groove wood cladding. The end product will look a little like the wall in this video:
And then the third change is going to be very dramatic, I think. Because one of us (::cough::cough::not me::cough::) is a bit of a clothes hoarder, storage solutions are always needed. At the moment, I don't like how cluttered this wall is:
 First of all, I'm not a particular follower of feng shui, but I have read The Joy Luck Club, so I do know that it's bad juju to have a mirror at the end of your bed, let alone two. Now that we have the mirrored cabinet in the bathroom, I don't really need a full length mirror anymore. And Mark needs more shoe storage. So I've decided to replace everything that's here with 4 Ivar cabinets, an unfinished pine product from IKEA.
The grey press here will go, and the mirror and everything that is in/on the press will go inside the lefthand two cabinets. On the right side, Mark will be able to store shoes and other items.
The Ivar looks like this:
 It can be wall mounted or stacked on legs. And the possibilities are endless when it comes to finishes -- it can be left natural or painted or even decoupaged or wallpapered! I've decided to do something a little different. Since I'll be installing four (two by two on legs), I have decided to put a natural finish on the top two cabinets and paint the bottom two. BUT I'm also going to paint that wall the same exact colour on the bottom of the wall, sort of like this effect, except probably not blue and there won't be other furniture involved:
 My makeup and jewellery, plus the mirror and the strip of lights will be tucked away inside a cabinet, getting rid of the chaos and clutter.
Other fun things I'll be getting are a new desk lamp, new trash bin, new desk chair, a rug, and I'm sure another couple of items as well :D Stay tuned for progress reports and plans!
Bit of a back story: Our house has two bedrooms -- the second bedroom functions as a library, office, and guess bedroom (via sleepsofa). It's a room for Mark's crap, which we clean up whenever guests come to stay. Some day I hope that we'll have decluttered enough to look decent 365 days of the year. But our bedroom is a pretty good size for a 1930s Dublin house, so that's where my desk lives. In the corner. The dark, dark corner.
As some of you know, I got a new job back in October, and come May when my probation is up, I'll be working from home two to three days a week. I have no interest in working in the chaos of the office, but I don't want to be stuck in the corner of my bedroom either! So that got me thinking...
Just out of interest (because it's bonkers), I'll share a photo of what our bedroom looked like after we stripped the wallpaper:


The next area that I want to change up is the wall behind the bed. Here's how it looks now:

As you can see, we have two tall black bookcases on either side of the bed. But the whole thing is kind of blah. So I'd like to do an accent shiplap wall and paint it black, sort of like in this video (except probably real shiplap instead of faux). Shiplap is generally a tongue-in-groove wood cladding. The end product will look a little like the wall in this video:
And then the third change is going to be very dramatic, I think. Because one of us (::cough::cough::not me::cough::) is a bit of a clothes hoarder, storage solutions are always needed. At the moment, I don't like how cluttered this wall is:

The grey press here will go, and the mirror and everything that is in/on the press will go inside the lefthand two cabinets. On the right side, Mark will be able to store shoes and other items.
The Ivar looks like this:


Other fun things I'll be getting are a new desk lamp, new trash bin, new desk chair, a rug, and I'm sure another couple of items as well :D Stay tuned for progress reports and plans!