Showing posts with label upstairsbathroom. Show all posts

Saturday, February 8, 2020

Upstairs bathroom big reveal!

Yes. I started my bathroom renovation.... uh.... eons ago! And it's been finished for a couple of months at least, but the way the window and light are, decent photos required another light. Also, a clean bathroom. But today I finally managed to clean the bathroom, get out the light, and take a few shots.

Let's just recall where we started, back in 2016 when we stripped the wallpaper and the flooring:

Pretty grim! And other than adding some lino and getting a new toilet, we didn't do much to it until these renovations. It became sort of a storage room, a place for crap to collect on its way to somewhere else.

Back in April last year, I made SIX blog posts about my renovation plans, which, in retrospect, may have been overkill. But lots of people were very helpful in the decision making process! And I feel like everyone felt personally invested in my bathroom.

Before I go into what I learned and some of the particulars, I'll just post the after photos!

We already had the mirror
Pretty excited about the tissue holder and the marble accessories

The basket on the left holds toilet rolls and
the one on the right is for dirty linen
I decided to paint the radiator and I'm glad I did

The brass shelves came from IKEA
I love how the sinks came out, especially the taps
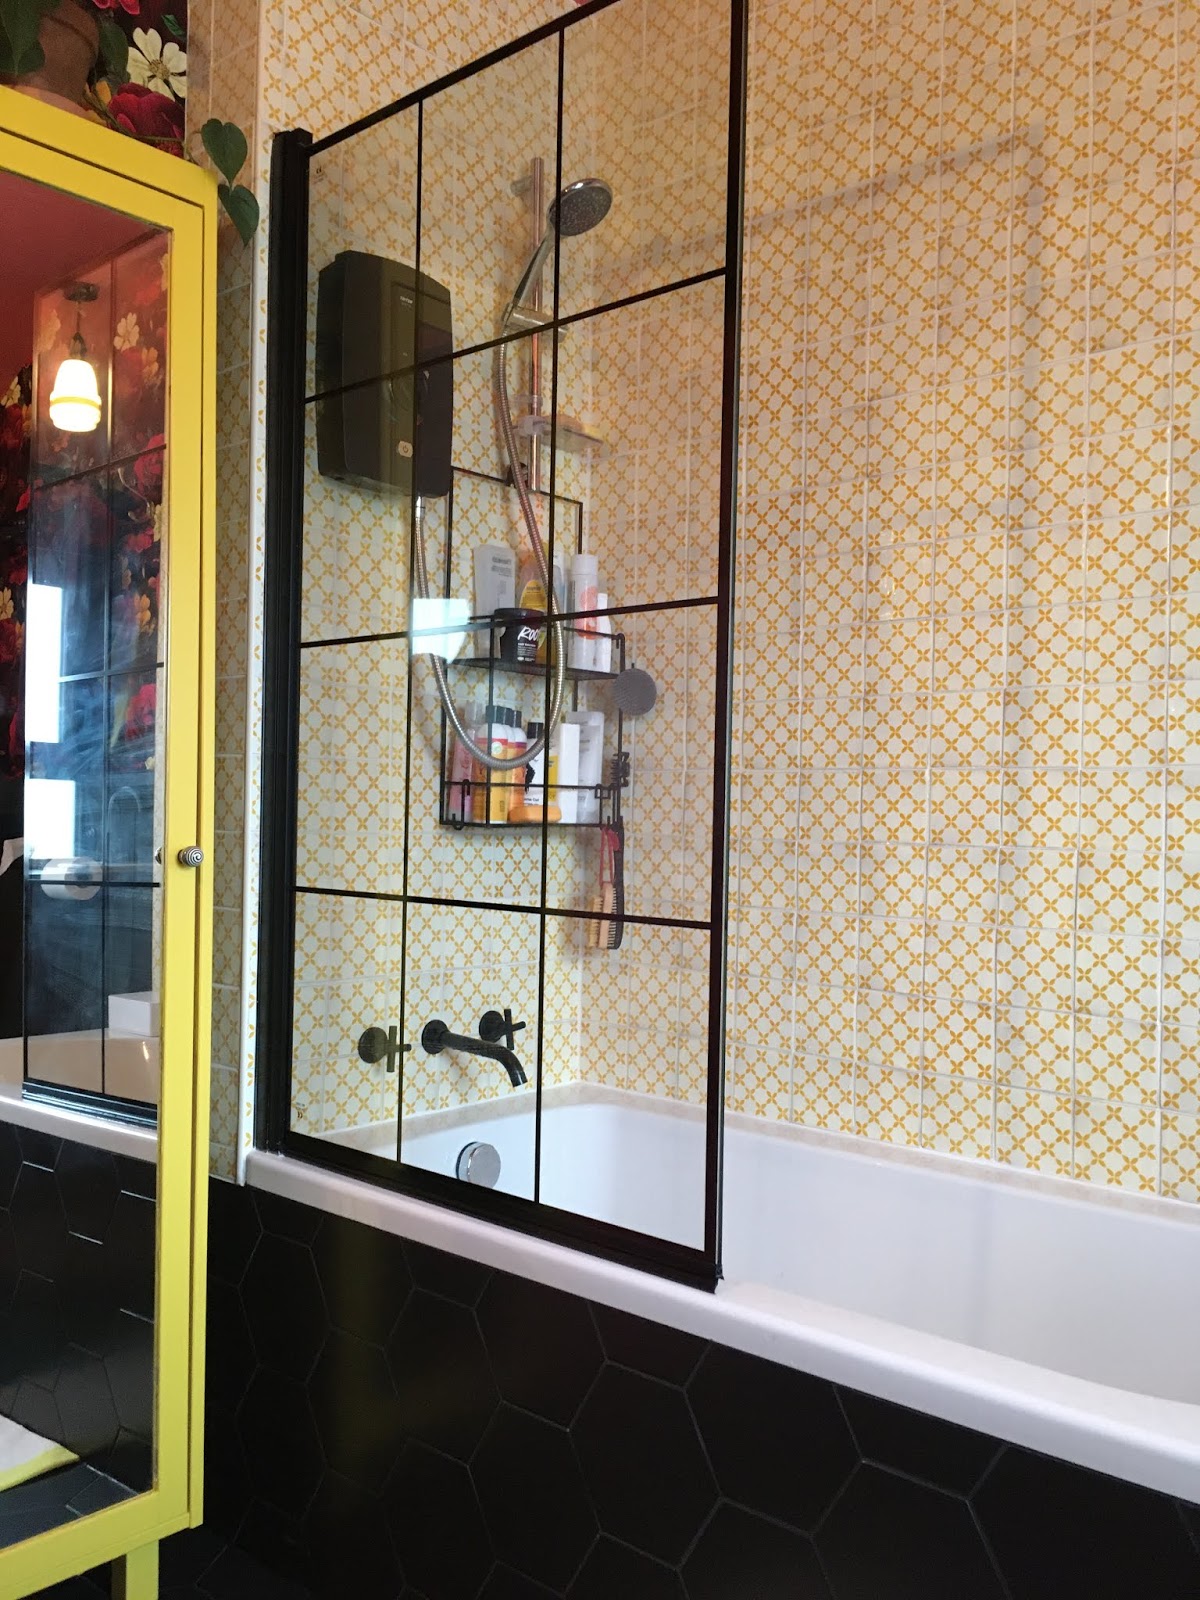
I'm overjoyed at how the faux pane shower door looks
Inside the cabinet is a double shaver outlet
  

The gorgeous brass hooks (4 of them) came from an antique wardrobe that I renovated last year

Having two sinks still feels ultra luxe. And this sideboard has tonnes of storage
While I like to think of myself as good with the ole DIY, we clearly needed to hire a builder for a good bit of this renovation. A lovely builder, Linas, was recommended to us. He and his colleague did an amazing, amazing job with the plumbing and tiling, ESPECIALLY since this was clearly not a standard job - I bought nearly everything off the internet without a clue what the heck I was doing. This did lead to some foibles, which I'll talk about at the end. 

The dresser is a particular point of pride -- stripping the white paint off without ruining it was a labour of love, particularly since I have little to no previous experience with stripping furniture. I was confident but not certain that there would be lovely wood underneath the white paint. I have to apologise because I had a heck of a time getting a good photo with the window. But the wood is lovely! The builders cut the holes for the sink and installed them. They did an amazing, amazing job. 

The yellow and white Mexican tiles drove Linas just a little bit nuts because they aren't all the same, neither in size nor thickness. I'm not sure he believed me when I told him I didn't want it to look perfect, and that he could just wing it with their placement. 

The black floor tiles are so perfectly done, especially considering how crap the floor was. They even matched the floor tiles to the bath surround tiles. 

Once Linas and his associate were finished with the plumbing and tiling, it was on me to do everything else, which included wallpapering, putting up the wall panels, painting the ceiling, putting up the hooks, towel rails, shelves, toilet roll holder, toilet brush holder, tissue holder, put together and paint the mirrored cabinet, remove and strip the door hardware, and paint the door, wall panels, and trim. It took me ages to get it all done! The walls are like chalk in some places, so I had to be fairly inventive to get everything up and secure (thank god for Sugru!).

Mark kindly painted the ceiling, which we did before we wallpapered. The walls are uneven in ways I didn't think possible, but I wanted the panels and trim to be at least somewhat level, so putting them up was... annoying. I chose a dark, daaaaark green paint for the wall panels and trim. Speaking of annoying, THE WALLPAPER! I miscalculated that situation and had to order more. Twice. And I still had to mismatch the pattern in TWO of the corners. But - no regrets! (Well, I do, but let's pretend I don't.) The decorator's varnish that I put overtop keeps it from being ruined by the moisture, but it also gave it a bit of a sheen so that it almost looks mural-like. I definitely did not try to make the walls even before I put up the wallpaper, so there are lumps and bumps, and I kind of like the imperfections. My whole idea behind this bathroom was that I wanted it to look like it belongs in an old house. I think I achieved that! 

Now, for the other fuck ups. The bath tub tap that I bought on ebay from China was apparently for a more high-pressure water system, so it took Linas hours to install it instead of the 20 minutes it should have taken, but he made it work in the end! 

I also bought a black metal ceiling pendant fixture, which turned out to be unusable because the original fixture didn't have a ground wire. So I ended up having to spray paint a plastic fixture and transfer the wire to it. Of course, then once I did that I realised that I didn't check whether the bulb bit fit into the glass shade we wanted to use. It's hard to see, even in person, but it doesn't sink into the shade how it should. One of these days, I'm hoping to get the glass cut. But for now, it's fine.

But the biggest mistake I made was the electric shower. DID YOU KNOW that there are electric showers that hook up to the mains? I DIDN'T EITHER. So, when the shower was finally up and running we realised that it's a bit temperamental compared to one that hooks up to the tank. If someone flushes, turns on the tap, or uses the dishwasher, the water either shuts off or goes cold, or both! So that's not ideal. When we have the money and the attic is cleared out more than it is now, we plan on swapping out the shower for one that can hook up to the tank. For now, we just have to take precautions. 

I made another expensive mistake when ordering the floor tiles. I wanted the largest black hexagon tiles I could possibly get. There were a few local places that had medium sized ones, but I had my heart set on something really big. But the ones I ordered from a place in Galway were confusingly labeled in an emailed photo, so when they arrived, they turned out to be basically a size that I could have gotten here in Dublin much, much cheaper. So that was a huge bummer that really burned me up until the tiles were in and I decided that the ones I bought actually look great. All's well that ends well. (As you may know, I do not believe that 'everything happens for a reason'.)

I also did kind of a crap job painting the yellow cabinet, so the paint is chipping off in places, but I'll fix that at some point in the future. For the moment, I feel very, very happy every time I walk into this room and it was definitely worth all of the effort. Thanks for coming along with me on this journey! 

Thursday, July 25, 2019

I need your help with the very last bathroom reno decision

Hello friends!

Well, I'm happy to say that the upstairs bathroom renovations have gone mostly to plan, and we're in the home stretch of putting it all together. I can't wait to show you how it looks! Everything has been decided and ordered, and will be installed in the next couple of weeks...everything but one item.

There's a small space (about 55cm) between the door and the tub where I want to put a tall storage cabinet. This cabinet will conceal the shaver outlet, so it needs to have a door, at least at the top half (and not a glass door!). I have been trolling the websites for something used/vintage, and haven't found anything suitable. Buying something new is my only option, but at this stage to say I'm on a budget is an understatement!

Here's a reminder of the bathroom wallpaper and wall tile in the bath surround:


As you can see, the wallpaper is quite dark, and the wall panelling below the wallpaper is a very, very dark green. The ceiling, however is a cheerful coral pink colour!

So for the storage cabinet, I wanted to go with something on the lighter side, but NOT WHITE. The tub, basins, and toilet are white, of course, but I just don't think white is going to look good for the cabinet. This means that if I want it a certain colour, like the yellow of the tile, I'm going to have to paint it myself. Also, I like the idea of a mirrored door, as the cabinet will face the only window, so in theory, a mirror would reflect the light.

Another option is to simply go with black or nearly black, which is more readily available.

Here's the issue I'm having: the cabinet I think would look good (if painted yellow) is 200 euro. I feel like that's a lot for something I'm going to have to put labour into. Here it is, the Hemnes cabinet (left):
200 euro Hemnes

I think this one is very similar in style to the dresser I converted for the double sinks. It's simple, but not as cheap looking as some of the others.

For example, this cabinet is 70 euro cheaper (once you buy legs), which is significant. but it just doesn't look nearly as nice to me:
130 euro Silveran

So if I want to avoid painting, I am considering dark options. For example, this mirrored cabinet is even cheaper, coming in at about 100 euro with legs:
100 euro Lillangen
But I kind of... hate it? And the trim around the door is chrome, which I'm not into.

This leads me to wonder whether I should just forget about having a mirrored door. The Lillangen without the mirror would probably be inoffensive with a different handle and nice legs (and ditch those hooks at the top). It's still 100 euro, but I think it looks nicer:
If I go dark and non-mirrored, there are other inexpensive options, but honestly they aren't much better than this. 

What do you think? Should I just pay more and do the labour to get the thing I want? Or should I compromise?


Wednesday, April 24, 2019

Upstairs Bathroom Renovation, part 5: decisions were made

As we get closer to starting work on our bathroom, I am happy to report that I have BOUGHT SOME THINGS. And some of them have arrived! It's all very exciting. I also changed my mind on something I thought I was sure about, which goes to show you need to be flexible sometimes.
Here's a visual for you!

I was pretty overwhelmed with the electric shower options, to be honest. You can spend as little as 80 euro on an electric shower and as much as 400. And almost every shower at every price point had a good handful of negative reviews, which didn't help my decision. I hadn't intended to get a black one, but as it happens the one I wanted was available in black, so why not? It was the Triton Pello. The tub and basins are ordered- they're pretty basic so I'll leave them for later.

The bath and basin taps arrived from ebay, and they look exactly as I hoped! And when the wallpaper samples arrived, I put them up on the wall. There were some I really loved, but in the end it was this dark floral that really captured us. However, I quickly realised that my marble wasn't going to look nice next to it. I had gotten a sample, and when I held it up next to the wallpaper, it was too cool-toned. Then I remembered this amazing Mexican tile I'd gotten a sample of a couple of years ago from a place in London. And sure enough, it goes perfectly with the orangey yellows in the floral. We both loved it. So that was that decision made.

I'm still very committed to the large black hexagons for the floors, though. It was a real pain to find the size I was looking for, but I finally found a place in Cork who sells them and will ship them to me. I must have sent messages to every tile place in Ireland!

I'm not sure which colour to paint the lower part of the walls, but I've a bit of time to decide. I extracted a couple of samples that might be nice -- there are so many rich colours to choose from that I don't think we can go wrong.

This weekend I managed to strip almost all the paint off of the dresser for the double sinks. I need to remove a bit more varnish, sand it down, and re-stain it, but the really messy bit is done now. I'll post before and after photos when I'm done. 

But it's really happening! Getting ready in the morning is going to be so much more enjoyable when it's done.


Tuesday, April 9, 2019

Upstairs Bathroom Renovation, part 4: the fun bit

I'm happy to report that we have found someone to do the plumbing, electrical work, and the tiling. He was recommended by a friend and his estimate was exactly what I thought was reasonable. But now that means I need to get all the bits and pieces so that we can do the work! (I say 'we' because actually I'm doing a lot of bits and bobs, like the faux wainscoting, putting up the wallpaper, hanging the curtain rails, etc etc.

But getting the stuff means making decisions! Decisions I've been pondering for over two years! And can you believe - I've decided? Mostly...

First of all, the floor tiles. I've decided to go with a large, black, matte hexagonal floor tile and black grout. Kind of like these, (but with black grout, like in the one on the right):


For the tub surround, I'm going with a smaller marble hexagon shaped tile, but with a spin! I'm going to go for GOLD GROUT. Now, there are glitter additives you can get for grout, but I think I'm actually going to paint the grout and seal it. OR - I might go with the gold glitter additive AND paint it gold, then seal it. There are epoxy products that I am also going to look into. It will have the grout effect of the photo on the left with the tiles on the right:

The rest of the room, which will feature a solid colour for the bottom 120cm of the wall and wallpaper from 120cm to the ceiling, has yet to be decided but I have seriously narrowed it down! 

Here are my top contenders for wallpaper:
Option 1
I love the variety of colours in Option 1, and it's bright and vibrant, but still has a touch of black to tie in with the black floors and fixtures.

Option 2
Right now, I am just in LOVE with Option 2. Some say it's too dark, but I'm not afraid of dark. I think it would look amazing above either a dark burgundy or a dark green colour.

Option 3
I'm always a fan of pink and green together, and I think it would look look great next to the marble. I also like how there is both green and a blue-green in the pattern.

Option 4
I like Option 4, but unless it's amazing in person, I can't imagine it beating out all of the other options. Still, I was curious enough to order a sample.

Option 5
I like this for a lot of the same reasons I like Option 3. I like the colours, the pattern, and the brightness of it.

Option 6
This is obviously the same as Option 4, but with a white background.

Option 7
Option 7 is a bit of a wild card, and would be an entirely different vibe altogether, but I love art deco and I  was curious about this one. I imagine it will be a bit too busy in the end.

What do you think? What's your favourite? Or are there other options you think I should consider?


Friday, April 5, 2019

Upstairs Bathroom Renovation, part 3: a conundrum!


Well, I thought I was so clever yesterday sourcing all those taps. Turns out I'm not as clever as I thought! So the cool bath tap image I posted in part 2 was actually a basin tap, so my first challenge was to find the bath tap version. But then I got to thinking about the basin taps I had chosen and I thought jeez if I'm going to all this effort, should I not get ones that match? That sent me on a search for this set, which I am in love with. However, as you'll see, they aren't cheap.
Basin mixer 1: €148 x2 = €296

Bath mixer 1: €193 (10% off with tub)


So, these are the taps I would buy if money was no object, totalling nearly €500. Basically, the only reason they are so expensive is the black finish. That same basin mixer is on ebay in chrome for about €25 -- in other words, the black version is nearly six times more money!

WHICH GOT ME TO THINKING...fuck that. I can DIY this too. A bit of sandpaper, some automotive primer, and some black matte spray paint and I'll be sorted! In case you think I'm nuts, I did do some research and I know that it can be done. It would save me over 300.

about €25 x2 = €50
about €100


But then there's a new conundrum if I go this direction! You see, my plan had been to go through the expense of bumping out the wall so I could have the wall mounted bath tap. But if I go with a painted chrome mixer, then there's an option which would allow me to avoid that expense. But I'd have to compromise on the cool sleek design for this, which is about €80:

Of course, you have to visualise this black. It sort of matches the basin taps better, but ... am I right in saying it's not anywhere near as cool? But I was thinking well jesus if you're going to give up on the wall mounted bath mixer, then maybe I should quit being so stubborn and consider other options. 

For example, this combo, coming in at €220:
About €52 x2 = €104
About €112
 But... I really just am not very excited about those, honestly. And then there's this combo for 220:

About €81
About €70 x2 = €140

With this one, I still have the expense of the wall mounted taps. I am also not psyched on these.

So I guess I'm leaning towards going with the basin mixers I really want in chrome and painting them black. But as for the bath, I really don't know which way to go. If I go with a tub-mounted tap I will be saving money in two ways, so it's hard to turn down. But I just absolutely LOVE that wall-mounted set!

What do you think I should do? And please don't say to give up on black taps!

UPDATE! I found an inexpensive version of the wall-mounted bath taps that I wanted! So... now the real question is... one of three choices. Do I buy the expensive version of the basin taps I want, do I buy the chrome version and paint them, or do I go with the basin tap I posted in part 2? Here are the choices, for your review:
296 for two
50 for two
72 for two


Thursday, April 4, 2019

Upstairs Bathroom Renovation, part 2

I'd like to talk about my plans for this bathroom renovation and how it's all going to come together. In an ideal world, I could walk into a place and say, "Give me that, that, that, and that," but first off, that would be expensive and also I literally haven't found one place that has everything I want. There are approximately 1 trillion bathroom renovation places in Ireland and they're all basically flogging different price points of the same stuff. The fashion, it seems, is to make a bathroom with floor to ceiling tiles in some sort of grey or beige colour and shiny fixtures that look like a hotel. Well, I love staying in hotels but I wouldn't want to live in one.

That's all a long way of saying I am cobbling this bathroom together piecemeal -- or cherry picking, if you will. If you clicked on my Twitter thread from my last post, you probably have a good idea of what I've been considering for the design. Unfortunately, my tastes are a lot more expensive than my bank account, so I've got to find a way to get the look I want for the price I can pay.

Let's start with the tub. You can spend a lot of money on a tub. Luckily, space dictates that I get a small tub (150cm by 70cm). And while I'd love to get a cool tub with jets and bells and whistles, that's simply not in the budget. So we're going to go with basically the least expensive tub available. How much is that, you ask? Well, I think I'm going to go super budget and get this tub for €102.
I was going back and forth in my mind because there are squared off ones that I like the look of, but cost 30 to 40 euros more. I have a lot of right angles planned for this room, and since I had already decided to go for rounded sinks, I thought the rounded edges of this tub would go with those, thus justifying being a cheapskate! 

Speaking of sinks (known in the bathroom game as basins), I mentioned in my last post that I wanted to use a vintage sideboard for my basins -- I'm going with a double sink so that I no longer have to feel rushed when I'm brushing my teeth at night! You may have seen these kinds of projects on pinterest. Something like this: 
There are loads of examples online featuring all different kinds of sideboards, dressers, and cabinets. I was on the lookout for something mid-century like this, but I also had some pretty strict size requirements. I was aiming for 120cm wide and no more than 140cm. A lot of those mid-century sideboards are looooong! And what's more, the ones I found were either just slightly not what I was looking for, or they were out of my price range. I also was looking for something kind of rustic looking -- NOT SHABBY CHIC, mind you! But something that didn't look new. After trolling the different used furniture websites for several weeks, I finally came upon a piece that I thought I could work with, and the price is right - €40! Even after I pay for the man with the van to collect it and bring it to my house, it still will be in the €100 range. However, it needs some TLC. Some heathen painted it, so I'll have to strip it back to the wood and refinish it. Luckily, I enjoy these kinds of projects:
It was made by Tibbenham furniture makers in Ipswich, England so I think I'll be able to remove the paint, sand it down, and finish it off with a nice water resistant oil for the look that I'm going for. I like the clean lines of this piece, and I like that it doesn't go all the way down to the floor, so it won't look too heavy. And if it turns out that the wood can't be re-finished, I'm happy to paint it a cool colour. I also figured that if I want to upgrade in the future, I totally can.

So what about the basins that will sit on top of it? I wrote a long thing about doing a countertop basin, but the thing about this sideboard is that it's 89cm high. Your average pedestal sink is about 80cm high, so it's already sitting on the high side for a bathroom sink. Therefore, I'm wary of doing a countertop basin and bringing the height up even more. For a recessed sink, I could go with two basins, or I could also go with a double sink that is one piece. This one, for example, would leave 8cm on either side and basically take up the whole depth. 
But I worry that it won't look good with that centre drawer section that comes out. Also, I had hoped to do something more rounded as a contrast to the straight lines of the sideboard. So, I could go the traditional route, like one of these (with a different tap, of course):
This would leave me with about 11.5cm on either side and between the two sinks. I think with a black tap, this could end up looking pretty cool. That one on the right is only about €50 (each), which I think is pretty affordable.

Speaking of taps, I want to go with black taps! But black taps tend to be on the pricier side. Also, it's harder to find inexpensive black taps that have the stark, minimalist look that I want. I took to ebay, and here's what I found. For the bath tap, even though it's going to take some construction to build out the wall for these, I think it's going to be super worth it because I absolutely love this tap and I found it on ebay for €55.
For the sink taps, I found these guys, which are about €36 each.
One annoying thing is that living in Cabra, we really don't want to go without an electric shower. We had a very bad experience living in a place without one and let's just say I took many a cold shower with zero water pressure in that place. But electric showers are uuuuuuugly. Even the expensive ones are ugly! So that will put a damper on my lovely design choices - seeing that ugly electric shower there. 

As for the electric shower, I'm undecided whether to get a new one or whether to just relocate the one that is in our current bathroom. I guess the reason why I'm hesitant is that it's probably about 15 years old and it's kind of a miracle it's lasted this long. It makes a sort of high pitched whining sound sometimes, too. So I'll probably replace it. But then - which one to choose? No matter what, I will probably spray paint it a matte black to match the rest of my fixtures. I mean - why not? They have this cool rubber paint now that might work.

And speaking of the shower, I want to talk about the bath enclosure! I have had my eye on some cool industrial ones, like this:
 

But actually you can't find them in Ireland. And the ones outside Ireland are about six times a normal bath screen anyways. So I decided I can easily DIY this look with a bit of black spray paint and some small strips of metal or wood. And if I want to add the frosted effect, they've frosted glass paint for that as well! Here's a photo of a white screen from Argos so you can visualise what I'm talking about. It's €100. I think it would be easy to turn into something resembling the photo above, especially with the tile grid in the background.
Other bits and bobs: I would like to put in a shaver outlet in a hidden cabinet between the door and the bathtub. This would also be where the shower switch would be located, and where we'd keep our towels and other sundries. But I haven't sourced that yet. Likely I'll buy some kind of second hand piece of furniture. 

Also, even though there is a window, I'm considering whether we'll need an extractor fan installed and whether that can go in the ceiling and shoot into the attic, or rather through the attic and outside. That will be an extra cost to consider. 

I might talk about tiles and colour palettes in a separate post. This one has taken longer than expected!